
To get paid quickly invoice you'll need to connect your direct deposit to a debit card rather than a bank account in your Stripe Connect account.
While setting up your Stripe Connect account:
- After completing the other steps under the Shift Settings in the Shifts tab of the app, select "Set Up" next to "Shift Payment Portal."
- You will be asked to verify your mailing address (this allows Stripe to send you tax documentation at the beginning of the year).
- Select the "Set up Stripe Account" button to proceed.
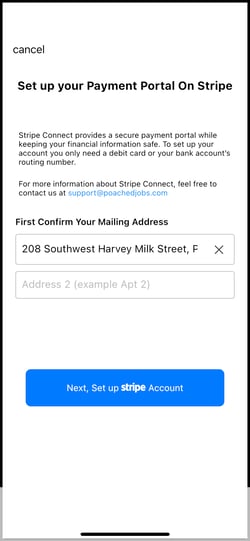
- Enter your Poached registered email and cell phone number.
- Next, enter the verification code Stripe sends via email or text.
- When asked to select an account for payouts, select the "Debit Card" option.
.jpeg?width=250&height=500&name=selecting%20debit%20card%20(1).jpeg)
- Enter your card number and expiration date and hit "Save."
- You will be asked to review your information one last time. If all looks good, select "Submit."
- You will now be directed to a Poached Success Page! Just select "Done" in the upper left to close your in-app browser.
Updating an existing Stripe Connect account:
- Select "Shift Settings" from the Shifts tab in the Poached App.
- Next to "Shifts Payment Portal," select "Access Account."
- A pop-up will appear telling you that you're about to open Stripe from your in-app browser.
- Select "View Reports" on Stripe.
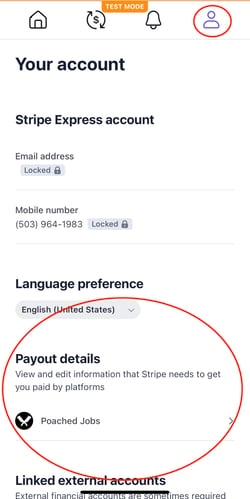
- Once you're in your Stripe Connect account, select the profile icon on the top right of the page.
- Scroll down to "Payout details" and select the "Poached Jobs" link.
- Click to edit the saved payment method.
- You'll have to enter your prior bank account information to update your payment details (if you don't have this information, you will have to contact Stripe's Customer Service.)
- Once you're able to make changes, select "Debit Card" and enter your card information.
PLEASE NOTE: The employer has 24 hours to approve your hourly invoice. This article is to walk you through the setup to become eligible for payments upon invoice approval. If the invoice is not approved within 24 hours, our system will process the invoice the next business day.